Bellingham Athletic Club

(360) 676-1800

Cinderella Scrub

Our Fitness Director, Mike Locke works with Alexa to demonstrate how to do the Cinderella Scrub (PDF) at home.

Equipment – Hand Towel, Plastic Plate, or Glide Disc Slider for Hands Pillow, Bath Towel, or Mat for Knees

Position – Quadrupled (Hands and Knees) Knees on Pillow, Towel, or Mat Hands-on Hand Towel, Plastic Plate, or Glide Disc Slider

Prescription – 2-3 x’s 30-60 sec for each movement

Cinderella Scrub Backward/Forward – Level 1

Scrub hands forward and backward with arms straight keeping hands under shoulders. Scrubbing motion should come from torso flexing and extending. To increase the intensity, lean forward placing more bodyweight on the hands.

Cinderella Scrub Left/Right – Level 1

Scrub hands left and right with the arms straight keeping hands under shoulders. Scrubbing motion should come from the torso rotating left and right not going farther than each knee. To increase intensity lean forward placing more bodyweight on the hands.

Cinderella Scrub Polish – Level 1

Polish with hands moving in a short circular clock-wise motion. Polish motion should come from the torso while maintaining the hands under the shoulders. Repeat in a counter-clockwise motion. To increase intensity lean forward placing more bodyweight on the hands.

By choosing to participate in any online class/exercise, you hereby waive and release all rights and claims for any damage you have against Bellingham Athletic Club and all representatives for all injuries which may be suffered in connection with your participation.

Online Exercises

Below are some workouts that our Fitness Director, Mike Locke suggests for working out at home.

ActivTrax at Home

Warm Up (video exercises)

Mobility & Flexibility (video exercises)

Core (video exercises)

Stability Ball Core (video exercises)

Stability Ball Stability (video exercises)

Bridge with Glide Disc (video exercises)

Corpse with Glide Disc (video exercises)

Lunges with Glide Disc (video exercises)

Spiderman Arm Crawl (PDF or video exercises)

Spiderman Crawl (PDF or video exercises)

Cinderella Scrub (PDF or video exercises)

Workout #3 (PDF)

Workout #2 (PDF)

Workout #1 (PDF)

Press here to check out our Exercise Class Schedule.

By choosing to participate in any online class/exercise, you hereby waive and release all rights and claims for any damage you have against Bellingham Athletic Club and all representatives for all injuries which may be suffered in connection with your participation.

Squat Matrix Foot Placement

by Mike Locke, Fitness Director

Our Fascial, Muscular, and Skeletal system is the system that allows our bodies the ability to move. Not in just one plane but through multiple planes. In training, it’s important that we keep this concept of multi-plane movement in mind.

If we focus on training this system in only one plane of motion we miss out on developing the other planes and their interaction with each other. By training multiple planes of motion we receive the greatest benefits to the entire system.

The Squat Matrix allows you to train in multiple positions by changing your foot placement giving you a 3-dimension training effect while performing squats! Foot placements can be by position: Neutral (feet pointed straight ahead), Externally Rotated (feet out like a “duck”) or Internally Rotated (feet in “pigeon-toed”), or by stance; shoulder width, wide, narrow, split, or 90 degrees.

If you are trying these variations remember to start slow and use a light load. You can use a Leg Press machine at first or just your body weight to refine your technique prior to increasing the load.

Our BAC Personal Training staff would be glad to assist you with any questions regarding how to incorporate the Squat Matrix into your training program.


Glide Disc – Backward Lunges

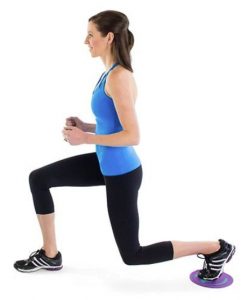
In the last two exercises of the month, we have looked at the progressions for split squats. The next exercise in that progression is adding movement of one leg to that stationary movement.

Backward lunges are the next progression to Split Squats. In the backward lunge, we are actively taking a step backward with one leg and descending downward until our front thigh and rear leg form two 90 degree angles. It is important that we keep both feet at least shoulder width to as wide as hip-width. If we narrow our stance or cross the mid-line of the body we increase the likelihood we might lose our balance and fall. From the 90-90 position, we transition back up to a standing position lifting through our hips while maintaining our posture and balance.

Using a Glide disc is a great tool to help you learn how to effectively do a backward lunge. Place the foot of the leg you will be moving backward on the disc. You should have the forefoot of your shoe on the disc. Carpet discs are hard plastic whereas hardwood floor discs are nylon. Both slide very easily on hard and carpeted surfaces so be careful as you slide the disc. When you initially begin, you can use a solid support or a mobility pole to assist you with balance. Later on, as you progress you can load your hands with weight or place a barbell on your shoulders.

Backward lunges are a great exercise for the upper thighs and the hips. If you have questions on this exercise please speak to one of Personal Trainers or Group Exercise instructors.

Assisted Split Squats

Last month, we introduced you to Assisted Split Squats, a stationary exercise to help you gain and maintain strength so that you may kneel down to the ground and then rise back up to standing. Once you have mastered the Assisted version of the Split Squat it is time to progress to the bodyweight unassisted Split Squat and then to the loaded version.

The mechanics for performing the bodyweight Split Squat are exactly the same as you did for the assisted. Start with your feet parallel about shoulder-width apart (see picture 1). While keeping your feet shoulder-width part step back with one foot approximately one stride length (see picture 2). This time let your arms hang down by your sides with your feet shoulder-width apart and one stride length from each other. Slowly lower your body until your front leg is at 90 degrees and your back knee touches or almost touches the floor. The back leg will also form a 90-degree angle. Pause and reverse the motion back up to the starting position. Make sure you push through the floor with the entire foot of the front leg and lift through the hips of that same leg. Complete for the prescribed number of repetitions then repeat on the opposite leg for the prescribed number of repetitions.

Please see one of BAC Personal Trainers if you have any questions regarding how to perform the assisted Split Squat exercise or how to include it your exercise routine. They would be happy to assist you.

Picture 1                                                    Picture 4

Assisted Split Squats

Kneeling down to the ground is a very normal everyday movement. We have to kneel down to pick something off the ground or to find something that we may have dropped. Kneeling down can become more and more challenging if we begin to lose some strength.
A stationary assisted Split Squat is an exercise that can help you gain and maintain strength in the lower body to allow you to kneel down to the ground and then rise back up to standing. It is the first progression of a Split Squat using assistance with only your body weight.
To perform the assisted Split Squat you need to start with your feet parallel about shoulder-width apart (see picture 1). While keeping your feet shoulder-width part step back with one foot approximately one stride length (see picture 2).

To start the exercise grasp a solid object (see picture 3 with a stable bar) with your feet shoulder-width apart and one stride length from each other. Slowly lower your body while holding onto the solid object for balance until your front leg is at 90 degrees and your back knee touches or almost touches the floor. The back leg will also form a 90-degree angle (see picture 4). Pause and reverse the motion back up to the starting position. Use the solid object to assist you up using your arms as much or as little as you need. Make sure you push through the floor with the entire foot of the front leg and lift through the hips of that same leg.

Complete for the prescribed number of repetitions then repeat on the opposite leg for the prescribed number of repetitions.
Please see one of BAC Personal Trainers if you have any questions regarding how to perform the assisted Split Squat exercise or how to include it your exercise routine. They would be happy to assist you.

Picture 1                                                    Picture 4
Picture 3                                                   Picture 4

Jump In!

by Mike Locke, Fitness Director

1. Reduce overuse injuries. The repetitive stress of intense, specialized training contributes to overuse injuries. Depending on water depth, aquatic training can reduce impact up to 85%, resulting in less stress and reducing the likelihood of injury.

2. Supplement land training. Many land moves can be mimicked in water, and clients can practice movement patterns without worrying about impact. Shallow water is beneficial for vertical jump training, transitional depths are good for racquet sports training, and deep water is valuable for long-distance training.

3. Add variety or overcome training plateaus. Water provides resistance in multiple planes of movement, allowing for new types of overload. Working in a different environment reduces boredom and adds fresh challenges.

4. Increase muscle strength. Cardiovascular and muscle endurance training can occur concurrently in the water. Correct training techniques and equipment make it possible to build strength.

5. Supplement speed and sports training. Coaches can teach sport-specific moves in the water. Aquatic training improves core muscle recruitment to stabilize the body against the water’s forces.

6. Facilitate post-workout recovery. The hydrostatic pressure from immersion increases circulation, reduces swelling, and enhances recovery. Water training provides a comfortable environment for active-rest workouts.